

Staining concrete floors to look like wood enhances their appearance and offers a cost-effective alternative to hardwood by improving durability, requiring low maintenance, and providing a stylish, natural wood-like finish without the high price tag.
The benefits of stained concrete floors are elevated aesthetics, durability, and cost-effectiveness. They provide a wood-like appearance at a lower cost and require less maintenance.
The tools and materials needed for staining concrete floors are concrete cleaner, stain, sprayers, brushes, painter’s tape, plastic sheeting, a concrete sealer, and protective gear. These tools help ensure proper application and protection during the staining process.
To stain concrete floors to look like wood, prepare the surface, apply a base stain, create a wood texture, seal the floor, and maintain it.
Some common issues when staining concrete floors include uneven stain absorption, streaks, color mismatch, poor sealing, and cracking or peeling. These issues arise from improper preparation, application, or weather conditions.
Minnesota’s concrete contractors industry is robust, with an expected market size of around $1.5 billion by 2025, encompassing concrete installation, finishing, and decorative services such as staining, as per an IBISWorld report.
What Are the Benefits of Stained Concrete Floors?

The benefits of stained concrete floors are that they offer durability, aesthetic versatility, and cost-effectiveness compared to hardwood or tile, and are an eco-friendly option. They are an excellent alternative to traditional flooring. Stained concrete floors require minimal maintenance and withstand heavy foot traffic over time.
What Tools and Materials Do You Need to Stain Concrete Floors?
The tools and materials you need to stain concrete floors are a concrete cleaner, stain, sprayers, brushes, painter’s tape, plastic sheeting, a concrete sealer, and protective gear. Using high-quality products ensures proper adhesion, color consistency, and durability.
How Do You Stain Concrete Floors To Look Like Wood?
You stain concrete floors to look like wood by carefully preparing the surface, applying a base stain, creating a wood grain effect, sealing the floor, and maintaining it properly. The process requires attention to detail and the appropriate techniques to achieve a natural wood-like appearance.
Here is a step-by-step guide on how to stain concrete floors to look like wood:
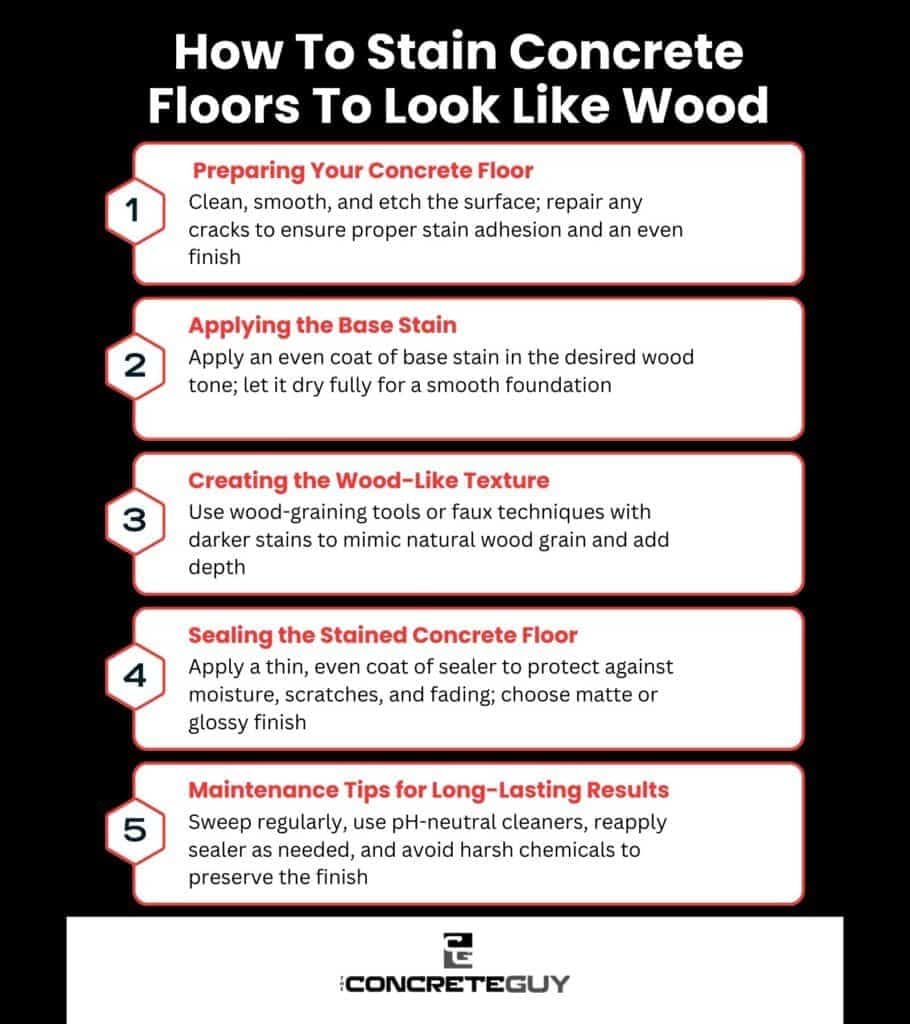
Step 1: Preparing Your Concrete Floor
Proper preparation is foundational for ensuring the stain adheres well and creates an even finish. The floor must be clean, smooth, and free of any coatings or debris. This involves sweeping, scrubbing, and possibly etching the surface to open up the pores of the concrete for better stain absorption. Repairing any cracks or holes before staining ensures a flawless surface and avoids imperfections in the final result.
Step 2: Applying the Base Stain
The base stain serves as the foundation for the wood-like look. It is applied using a pump sprayer or roller in long, even strokes. The color is chosen based on the type of wood you want to mimic, such as oak, mahogany, or walnut. Allow the stain to dry completely before moving to the next step. Apply the stain evenly to prevent streaks or blotches, ensuring a smooth and uniform finish.
Step 3: Creating the Wood-Like Texture
A wood-graining tool or a faux wood technique is utilized to mimic the grain pattern of wood. This step incorporates dragging or rolling the tool through a darker stain applied over the base coat. Layering different shades magnifies the realism, giving the floor depth and dimension. Experiment with different wood-graining tools or techniques, like using a cloth or comb, to derive more detailed and varied patterns that resemble natural wood.
Step 4: Sealing the Stained Concrete Floor
Sealing protects the stained surface and augments its longevity. A high-quality concrete sealer aids in curbing scratches, moisture damage, and fading, and offers a glossy or matte finish, depending on the desired look. The sealer is applied in thin, even coats for the best results. A good sealer will also make cleaning easier and hinder dirt or grime from settling into the stained surface.
Step 5: Maintenance Tips for Long-Lasting Results
Regular maintenance is necessary to keep the stained concrete floor looking like wood. This comprises sweeping or dust mopping to preclude dirt buildup, using pH-neutral cleaners to avoid damaging the stain, and reapplying sealer as needed. Avoid using harsh chemicals or abrasive tools that wear down the finish. Frequently inspecting the floor for damage and addressing any issues promptly will ensure the finish remains intact for years.
What Are the Common Issues When Staining Concrete Floors?
Some of the common issues when staining concrete floors are uneven stain absorption, streaks or smears in the finish, color mismatch, poor sealing, and cracking or peeling.
These issues are caused by improper preparation, incorrect staining techniques, or environmental factors, as discussed below:
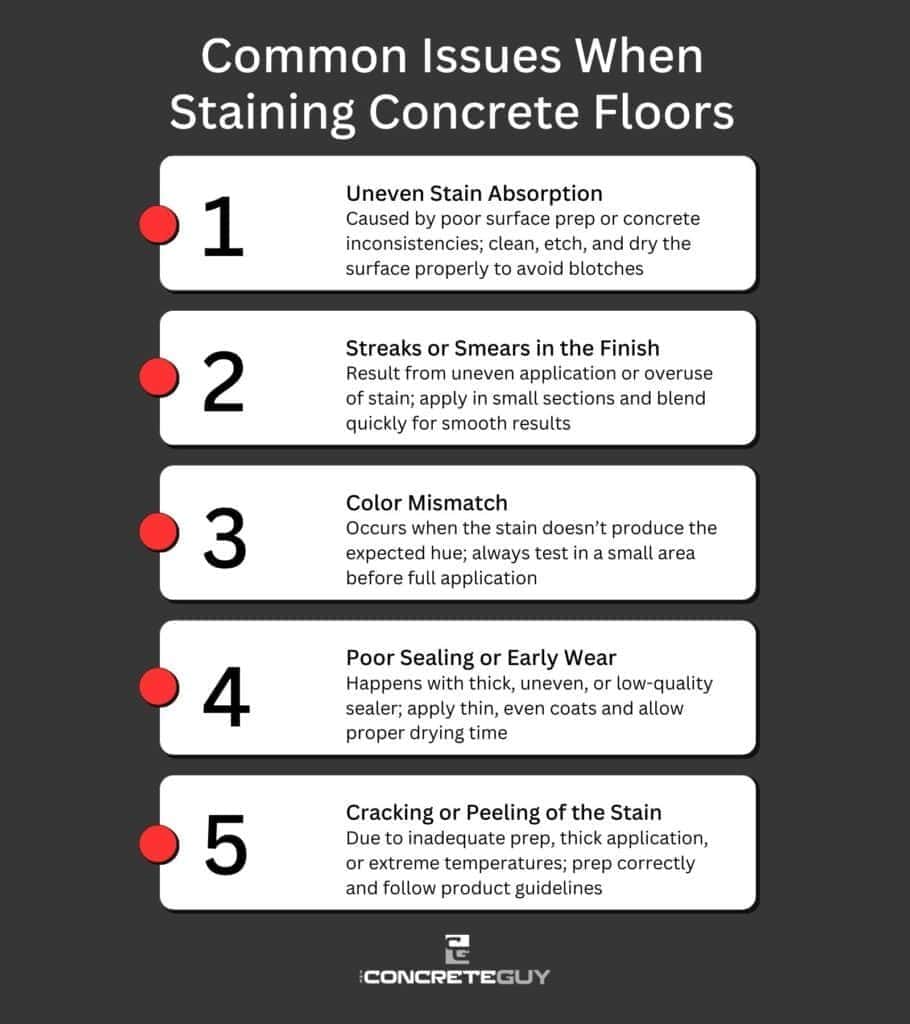
- Uneven Stain Absorption: Uneven stain absorption occurs when parts of the concrete absorb the stain differently, leading to blotchy or streaky results. An unclean or improperly prepared surface brings this about, or variations in the concrete itself. To bypass this, make sure the floor is thoroughly cleaned, etched, and properly dried before applying the stain. Applying the stain in even strokes and working in small sections assists in uneven absorption.
- Streaks or Smears in the Finish: Streaks or smears happen if the stain is not applied evenly or if there’s too much product in one area. This is due to using a sprayer or roller incorrectly or not blending the stain quickly enough. To fix this, work in manageable sections and mesh the stain promptly after applying it. For smoother results, consider using a rag or brush to blend out the streaks.
- Color Mismatch: Achieving the desired wood look is challenging if the stain’s color doesn’t match your expectations or the wood you are trying to replicate. The color of the concrete and the type of stain used affect the final result. Always test the stain in a small, inconspicuous area before applying it to the entire floor to ensure it produces the desired hue.
- Poor Sealing or Early Wear: Sealer is a critical step in protecting the stained floor, but sometimes is applied too thickly or unevenly, precipitating streaks or a cloudy finish. Additionally, a poorly applied or low-quality sealer wears down quickly, inducing the stain to fade or become damaged. Ensure you apply the sealer in thin, even coats and allow each layer to dry completely. Reapply as needed based on foot traffic and wear.
- Cracking or Peeling of the Stain: Cracking or peeling of the stain ensues if the concrete wasn’t properly prepared or if the stain was applied too thickly or in extreme weather conditions. To circumvent this, ensure that the concrete is fully cleaned and prepped, and block staining when the temperature is too hot or cold. Always follow the manufacturer’s recommendations for proper application conditions.
How Do I Find a Local Contractor to Stain My Concrete Floors?
To find a local contractor to stain your concrete floors, search for “concrete staining contractors near me” or “local concrete floor staining services” online. Check Google reviews, project galleries, and credentials to ensure quality and experience. Look for contractors who specialize in acid stains, water-based stains, and decorative concrete finishes. Always request a quote and timeline. For best results, choose a contractor familiar with Minnesota’s climate and concrete conditions.
What Is the Cost of Staining Concrete Floors in Minnesota?
The cost of staining concrete floors in Minnesota ranges from $3,000 to $18,000, as compiled by HomeAdvisor, depending on square footage, stain type, and surface condition. Acid stains and water-based stains vary in price according to color complexity and finish. Intricate designs or prep work on damaged floors raise the overall cost. For an accurate estimate, contact a local concrete staining contractor who will assess your space and provide custom pricing.
Can stained concrete floors really look like hardwood?
Yes, stained concrete floors can really look like hardwood using wood-grain tools and layered stain colors when done correctly. The result is a durable, realistic wood-like floor with less upkeep.
What’s the best stain to use for wood-look concrete floors?
The best stains to use for wood-look concrete floors are water-based and acid-based stains. Water-based stains offer more color control, while acid stains create natural variegation. Choose based on desired tone and floor condition.
How long does it take to stain concrete floors to look like wood?
The process to stain concrete floors to look like wood takes 2–5 days, depending on the prep work, drying times, and sealer application. Temperature and humidity in Minnesota may also affect drying and curing time.
Do I need a professional to stain my concrete floors like wood?
Yes, you need a professional to stain your concrete floors like wood because hiring a professional ensures proper surface prep, even stain application, and lasting results. For intricate wood-grain effects, Minnesota-based concrete staining contractors offer specialized tools and techniques.